| Now all we need to do is import
the textures to be used with the cmx files. 1: Click the "Import
Skin Textures (*.bmp)" button.
2: Select the following in the import texture selections on the right.
Normal
Male
Adult
Fit
Light
Substitute any above setting as necessary to match the body cmx you created
in the CMX Builder. The last setting can be any skin tone desired when using
it in your game though. Since it is a costume for Halloween you may want
to import it once for all three skin tones.
3: Type Zombie in the texture name box.
4: Now click the drop down box under the name and locate the cmx in the
list that we created and select it. (B900MAFit_Zombie)
The original skin in this window may very well have been gray. Or rather
a gray X. If so then it was because X.bmp was selected as the default texture
in the skn file it was displaying. You will now notice it has a normal body
texture displayed. That is because this particular skn file has a normal
texture listed in the skn file. We still need to specify the texture we
want to import here which we will do next.
5: Now click the "Choose *.bmp File" button.
6: Navigate to the MaleMonster folder.
7: Select the "zombiemfat_mnst.bmp" file and click Open. This
is the body image used for this body.
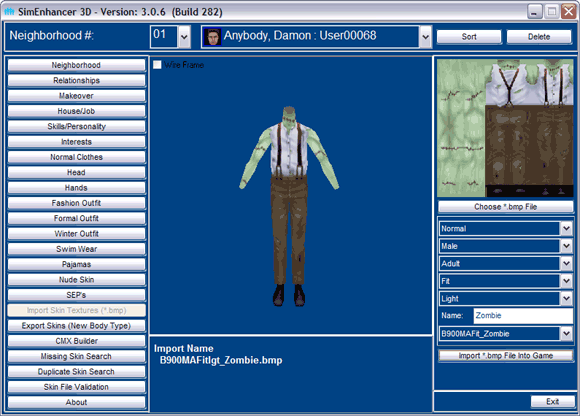
Your window should look like this now.

8: Verify the following:
The flat image above the Choose *.bmp File button has the right image.
The "Import *.bmp File into the Game" button is enabled.
The import Name matches that is below the 3D View.
B - Normal Outfit
900 - The series number
M - Male
A
- Adult
Fit - Fit
lgt - Light skin tone (or med or drk)
_Zombie - the name after the underscore.
9: If everything looks right then click the "Import *.bmp File into
the Game" button.
10: Double check the names and click OK.
11: Click No when it asks you about deleting the original file. (This
is optional however you will want to keep it if you are importing to other
skin tones)
12: If you are importing it to other tones then simply change the skin
tone and repeat the last three steps again.
Click Next below to import the texture for the head cmx file. (Do not
change any settings yet)
|