|
 SEP stands for SimEnhancer
Profile and is a new file type used by the SimEnhancer Profile files that are imported
and exported. All SEP files will have a .sep extension. SEP stands for SimEnhancer
Profile and is a new file type used by the SimEnhancer Profile files that are imported
and exported. All SEP files will have a .sep extension.
A SEP is a SimEnhancer Profile of a character that you can import into your game
to replace any existing character. You can also export any character you have in
your game to a SEP file. This can be as simple as to allow moving characters between
neighborhoods or can be used to allow you to share your characters with others. An
example of these is the SEP files at the SIMply Dariene
Lollipop Shop and at Coaster's
both at SimLane.com. You can also download
my SEP file by clicking the SEP box to the right. Special thanks go to Renate at
SimLane.com for the gift box artwork. SimLane.com can be credited with bringing
the idea to me in the first place and they worked hard right along with the SimEnhancer
Beta crew for several weeks to put it together.
Some ideas for using SEP files.
1: Move a character from one neighborhood to another.
2: Move a character from a home address downtown (Kids getting to old? Send em packing.)
3: Share your favorite character with your friends.
4: Collect a bunch of them and use them to replace Townies or Tourists you do not
like.
5: Create a SEP of yourself with the attributes set to your real life interests,
job, etc.
What does a SEP file include? A SEP includes all character specific data that can
safely be exported and then imported into another game. It includes the First Name,
Job details, Skills, Personality, Interests, and Skin files that are not already
included in the default game far files.
What is not included? House data, Last Name, Simoleans, and Relationships are all
shared and can't be imported without effecting other characters.
Note: If you get a message during Import or Export saying some components are missing
you will need to get the latest MDAC Microsoft Data Access Components before you
will be able to use the SEP Import and Export. A link to MDAC 2.7 can be found in
the FAQ's.
Importing SEP
files step by step.
1: First select a character you wish to replace.
2: Click the Import SEP File button.
3: Locate the SEP file you wish to import, select it, then click Open.
4: A warning will appear telling you you are about to replace the current character.
Click OK.
5: A warning may appear here if the export did not include all files listed as being
required. If you know the files already exist click OK. Read the Note above regarding
files that are listed as being required.
6: The Ratings and Credits will appear. Make sure the rating is appropriate and
click OK.

Sample Rating & Credits screen at Import.
7: Read the message regarding skin files that will be displayed in the next screen.
Then click OK.
8: Here you will have the option to uncheck any skin files you do not wish to import.
Then Click OK.
9: A message will appear letting you know the import is complete.
10: Just in case all skins were not imported you should open the Skin Makeover Kit
and make sure each body type has a skin assigned to it. For SEP files exported with
earlier versions of the game they will often not have skins assigned for Hot Date
and Vacation specific skins.
Exporting SEP
files step by step:
1: Choose a character using SimEnhancer and adjust the personality, interests, etc.
and save it. If it is already the way you want then this can be skipped.
2: Click the Export SEP File button.
3: Read the Warning regarding using skins and meshes that you may not have permission
to distribute. Please do not distribute any files without the permission of the
creator. Then click OK.
4: Choose a location to save your SEP to. I suggest creating a directory to use
just for SEP files. I do not suggest you use the Game directory though because the
game already has enough to search through without adding more. Enter a name for
your SEP and then click Save.
5: Read the message regarding skin files that will be displayed in the next screen.
Then click OK.
6: Here you will get a preview of all skin files that will be included in your SEP.
Please double check and make sure you have permission to distribute all of the included
files. You can uncheck individual files you do not wish to include. If you know
these files will exist then you can uncheck all of them. An example would be exporting
and importing between neighborhoods.
Note: SimEnhancer checks each cmx file and skn file for any meshes and skins that
are listed in them. This is to insure that all accessories have the necessary meshes
and bitmaps required. Often times this includes bitmaps for bodies and heads that
are not necessarily required but that are listed in the second line of the skn files
(minus the .bmp extension).
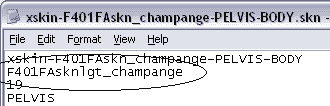
This file unnecessarily lists a specific skin bitmap.
SimEnhancer has no way of knowing for sure if these files are for the bodies, heads,
or accessories. Therefore if it is listed as being needed then it will be in the
export list. For any Heads or bodies I export I double check the second line in
the skn files and change it to use the x.bmp by putting an "x" on the
line instead of the listed bitmap unless it is an accessory.
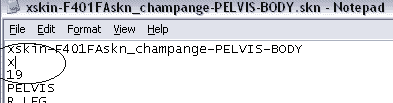
Changed to an x to use the x.bmp as the default bitmap instead.
Many default game files up until Hot Date were done this way and it is perfectly
normal. SimEnhancer will then ignore this line since the x.bmp is included in all
game installations. Alternatively you can just uncheck the extra files but there
will be a warning about it when the file is later imported. If you plan to distribute
files on your site I suggest taking this extra step so people can feel more secure
when they import your files.
7: Click OK.
8: Now you will see the Rating and Credits screen. This screen has two parts. On
the left you can enter any credits and information you wish to include. In the event
you have obtained permission to distribute someone else's work then this would be
where you give them credit for their portion of it.
Blank Rating & Credits screen
9: On the right will be a ratings selection. You will be required to rate any file
you export based on the content included. It would not be appropriate to distribute
a file with anatomically correct nude bodies using an everyone or teen rating. Please
be honest since others will use this as a basis for importing files when children
may be using them. Click OK after Rating the file.
10: A message will come up when the export is complete and you can then click OK.
|