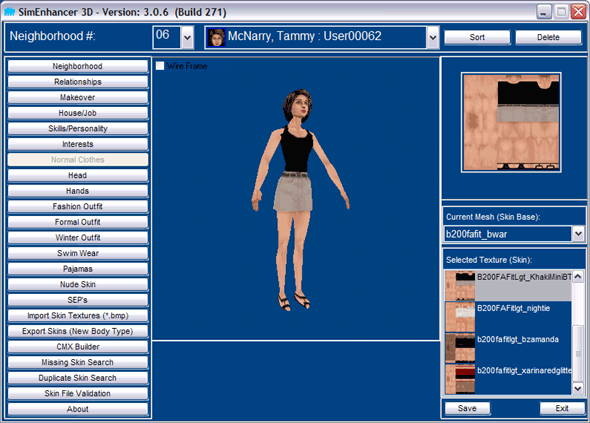
 The various screens for changing outfits all use the same basic interface. The only
differences are Pets which only have one outfit that can be changed, when changing
Pets or Heads a new set of thumbnails are created since it effects the look in the
game regarding thumbnails, and Nude Outfits when using Unleashed and/or Superstar
expansions. See Additional Notes below for details about Nude Outfits.
The various screens for changing outfits all use the same basic interface. The only
differences are Pets which only have one outfit that can be changed, when changing
Pets or Heads a new set of thumbnails are created since it effects the look in the
game regarding thumbnails, and Nude Outfits when using Unleashed and/or Superstar
expansions. See Additional Notes below for details about Nude Outfits.
Viewport is larger to make it easier to see the effects of each change.
On the right at the top is a flat display of the texture. Actual representation
is displayed in 3D view though so what is displayed may not match if there is a
problem in the files used.
Below the flat display is a drop down list of configuration files. (*.cmx files)
The configuration (*.cmx) files are what actually list the meshes used for the skin
and may include accessories (hats, glasses, etc).
List of alternate textures (*.bmp files) available for the selected configuration
file.
To change the outfit first choose the configuration file to use in the top list
on the right. Then choose a texture from those available for that configuration
file in the lower list on the right.
Additional notes:
In SimEnhancer 3D Ver. 3.0.6 Bld. 279 new delete buttons were added to assist in
deleting unwanted skin files. To delete cmx files you must first delete any bmp
files listed with the cmx in the selected skin tone. (You actually should first
check all skin tones to be sure all bmp files are first removed that are used with
a particular cmx file) Always be sure to run the Skin Validation and Missing Skin
Check in every neighborhood you play after deleting any skin files. This is absolutely
necessary as it is actually possible for a bmp file to be assigned as the default
inside a skn file. If a problem is found you can restore the files from your recycle
bin as long as you have not emptied it yet.
When either Sims Unleashed or Sims Superstar expansions have been installed Nude
outfits can only be replaced by either replacing the default nude outfits in the
game or by assigning a texture (bmp file) with a name that matches the normal outfit
that a character is wearing. Another words they need to have the texture assigned
to normal outfits instead of assigning them to the character itself. Doing this
will effect every character that happens to be wearing the same outfit. In SimEnhancer
3D Version 3.0.4 and above the nude outfit can be assigned by either importing a
skin texture (Import Skin Textures button) which will automatically name it appropriately
or by exporting skins to use as a default replacement set. (Export Skins button)
When exporting skins it will be able to see any nude outfits that are still in your
game that are named for use with Hot Date or Vacation.
When you are only using the original game, Living Large expansion, or House Party
expansion you will need to add Hot Date named Formal outfits and Swimwear before
you will be able to change these two outfits. There are many sites available with
free downloads of these or you may decide to create your own. There are also many
sites with tutorials for doing this as well.
SimEnhancer 3D Viewport always tries to display a configuration as it will be seen
in the game. If there are problems in the configuration file it might display something
that is not expected. For instance it may display x.bmp (A grey bmp listed as the
default in many *.skn files) if they xskin........skn file does not contain the
right name to be usable as a normal part that accepts alternate textures or may
even display the default image listed in the *.skn. This should be an accurate representation
of what will be displayed in the game though even if it is unexpected.
If you select an outfit and the assigned skin does not exist SimEnhancer 3D will
randomly assign one that does exist. This will normally be the reason behind a pending
changes message when closing or changing neighborhoods even though you did not directly
make any changes.
Another common problem is that the lines in the *.cmx file that describe which meshes
to use need to have the portion describing a mesh that accepts alternates in UPPER
case for the game to use them as an alternate. For instance xskin-B001dog_aussie-pelvis-dogbody
in the cmx file results in the xskin-B001dog_aussie-PELVIS-DOGBODY.skn using the
default listed in line 2 of it.(B001dog_aussie.bmp in this case) Whereas xskin-B001dog_aussie-PELVIS-DOGBODY
in the *.cmx allows the mesh to accept alternate textures (*.bmp files) such as
B001dog_myaussie.bmp.
It is a common misconception that changing line two in the skin removes the texture
from it. Nothing is actually further from the truth since there is always a default
listed. Using an X simply tells the game to use x.bmp which exists in every game.
That prevents crashes when a texture assigned does not exist since it will always
have the default available. In the event this line lists a non-existent texture
it can and often does cause crashes that are hard to diagnose. Skinners should keep
this in mind when creating skin sets and should always check this line and set it
to x unless it is an accessory in case the texture is removed but not the *.skn
file. It will not effect the way the normal body parts display if the *.cmx is properly
written.
|