Features for the Import Skin Textures (*.bmp) Screen:
Used for Importing existing textures (*.bmp files) to use with existing meshes.
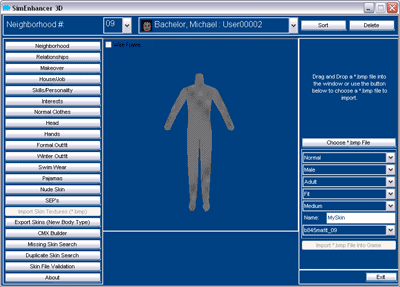
This screen is used to easily import textures to use on existing meshes. When you
first open it you will see something like what you see above. You will see a mesh
(based on the *.cmx configuration file) with a grey x. (See how there is a grey
x in it) This is the most used default texture because it exists in every game.
Once you add a bmp file then it will either display the bmp file if it accepts alternate
textures or it will display the default texture if it does not. All files have a
default texture but x.bmp is substituted to avoid confusion before a bmp is actually
assigned.
The first thing you will want to do is add a texture to the screen. This can either
be done by clicking the Choose *.bmp file or you can drag a file from Windows Explorer
into either the 3D Window or the smaller Flat display. The dragging and dropping
make it really easy to see what you are looking for if Windows Explorer is set to
show thumbnails. (This is not available in all versions of Windows)
Next you will want to select the mesh you want it to be used with.
These are what each drop down list represents:
Body Type - Choose from the available body types. The items below may change for
certain types such as dogs which have very few options.
Gender - Choose the gender for the imported *.bmp. Not available for Pets.
Age - Is it for an adult or a child? Not available for Pets.
Body Size - The fitness for the imported *.bmp. Not Available for Pets
For the above items the mesh displayed will change with each selection.
Skin Tone - The color shade for the imported *.bmp
Next you will want to give your imported *.bmp a unique name. This is just for easy
identification and does not effect what mesh it is used on.
Now you will select from the available *.cmx configuration files. If none of them
look right then go back and make changes to the other settings until you like what
you see.
Once you have done this you should see something like this: (Actual types etc. excluded.)
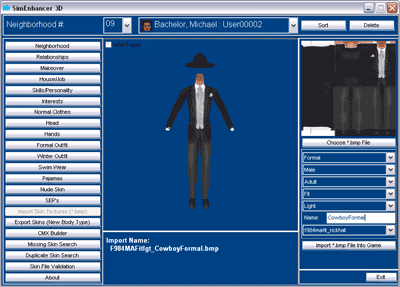
Notice there is some text at the bottom of the window. Here is a closer view:
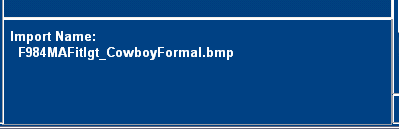
This is the name that will be used for this texture. It will be available for use
on any *.cmx file that begins with F984MAFit_ (lgt is not included in *.cmx file
names because they can be used for any skin tone)
Last you will click the Import *.bmp File into Game button. Once you do the texture
will be placed into the GameData\Skins directory in your game and available for
use on the selected *.cmx configuration file when selecting outfits.
Additional Notes:
Each time a texture is added it will be validated to make sure it will not cause
problems in the game. If the colors are wrong it may even offer to help by changing
them to the required colors. It will not allow a texture to be used until it passes
validation though.
When either Unleashed or Superstar expansions are installed SimEnhancer 3D version
3.0.4 or higher automatically sets the name when importing skins to use as a Nude
skin so that it will be valid for use with the normal outfit the selected character
currently has assigned to it.
|