|
1: Go ahead and open SimEnhancer 3D now.
 2: We now
need to create two new CMX files to use for the body and head files respectively
so we need to click the CMX Builder button. 2: We now
need to create two new CMX files to use for the body and head files respectively
so we need to click the CMX Builder button.
3: On the right in the CMX Builder Selections choose the following:
Normal
Male
Adult
Fit
Modify these as necessary if you are changing the type of skin set you
will be using this for. For instance you may want to set it up so your kids
are wearing this outfit instead
4: Type "Zombie" in the name text box. (Substitute a different
name here if you wish)
5: Now put in a series number. I chose 900.
 6: Now drop
down below the cmx edit box and click "Add *.skn Files". 6: Now drop
down below the cmx edit box and click "Add *.skn Files".
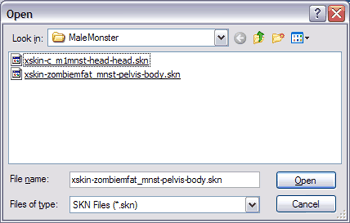
7: This will probably default to the skins folder in the game. If so
then navigate to the MaleMonster folder which should be one of the first
folders in the list of files. If not then you will need to navigate to the
Skins\MaleMonster Folder like the image to the right shows.
If there was more than one skn for the body then we would "Add *.skn
Files" for each one. You can open the original cmx file in the MaleMonster
folder in notepad if you need to see if there is more than one skn file.
This will not be necessary here though as there is only one for this NPC
for the body.
8:Now click the skn file for the body. "xskin-zombiemfat_mnst-pelvis-body.skn"
and click open. This will now add the xskin-zombiemfat_mnst-pelvis-body.skn
to the new cmx file we are building.
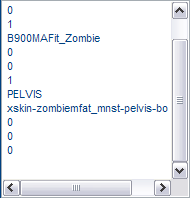
 The cmx edit
window should now match that displayed on the right. You also should see
the body in the 3D window. (The texture displayed will be the default texture
listed in the skn file) The cmx edit
window should now match that displayed on the right. You also should see
the body in the 3D window. (The texture displayed will be the default texture
listed in the skn file)
9: Now we can save the cmx file we have created. Click "Save *.cmx
File"
10: Navigate to the "Skins" folder for the game and save the
file. It will be named "B900MAFit_Zombie.cmx" which you will also
see listed on line 5 of the cmx file in the edit window (minus the extension).
Be sure you save to the Skins folder instead of the MaleMonster folder so
we can use the cmx file in the game.
In the next few steps we will create a cmx file for the head. Most of
the selections are already made for us form the body cmx we just created.
11 Now go to the first selection in the cmx selections and change it
from Normal to Head.
12: Then click the Clear *.skn Files button to clear all skn files for
the cmx.
13: Click the Add *.skn Files button and make sure we are still in th
MaleMonster folder.
 14
Select the "xskin-c_m1mnst-head-head.skn" file and click Open
just like we did in steps 6 and 7 above. If we had a hat or glasses or some
other accessory we would add as many skn files as needed. 14
Select the "xskin-c_m1mnst-head-head.skn" file and click Open
just like we did in steps 6 and 7 above. If we had a hat or glasses or some
other accessory we would add as many skn files as needed.
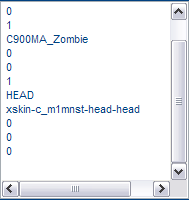
The cmx edit window should display like the one to the right. The head
will also be displayed in the 3D window. If you add a hat or other accessory
it will be added to the dispaly so it can easily be checked.
15: Now we can save the cmx file we have created. Click "Save *.cmx
File"
16:Navigate to the "Skins" folder for the game and save the
file. It will be named "C900MA_Zombie.cmx" which you will also
see listed on line 5 of the cmx file in the edit window (minus the extension).
Be sure you save to the Skins folder instead of the MaleMonster folder so
we can use the cmx file in the game.
We now have both of the cmx files we need in the game folder so we can
use them.
Click Next below to continue to the next step.
|